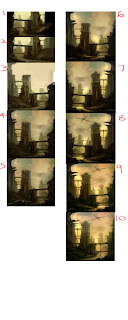
 10 step tutorial
1. Layin a rough compostion to begin with.
2. Establish a general light source and direction early on because everything in the scene will be based off of that. At this stage, you want to nail your values well. Don't worry about color for now. Solid value grouping will enhance your color later on.
3. I decided that the composition will be more effective vertical because I want to show the tower and the vertical structure more so the canvas was expanded using the crop tool.
4. Using a stock sky photo, proceed to place it in. I used Multiply since it seems to work best for this piece because of the mood.
5. Continue to block in the major details. I used a stock photo of a rock for the foreground and used curves to correct the lighting. Using color balance, I proceeded to match the rocks to the palette of the painting. When using photo textures, it's a good habit to try to make the photo consistent with the "paint" in the scene. Usually in my tighter paintings, I end up painting it and variating a lot that there's no photo left. However, don't let the textures do your work, you still need to apply the fundamentals of painting. :)
6. The tower was detailed a bit more as well as the rest of the scene. Keep in mind to have the canvas in its entire view when painting the general area. This will keep you from getting "tunnel vision" and neglecting the entire composition. Make a habit to flip your canvas often to check for compositional balance.
7. In this step, it's time to add a bit of "drama" by placing high key values in key areas to make the scene pop.
8. Using soft light I added some warm and cool colors for the light. On another blending layer,
color dodge was used to add "light" to the scene. The clouds were painted over a bit for variation. Creatures were indicated for scale. Color was then further adjusted.
9. Flip the canvas again to check for balance. Continue refining.
10.For the second to last step, I wanted to achieve a feel of an old classical painting so a texture was overlaid on the painting to give it some "tooth", but it is very subtle.
In the final painting, the support column of the bridge looked too simple so it was beefed up. See previous post. This painting can be tightened to your heart's content, but for the purpose of this image, it should suffice.
Enjoy!


